Point Your Domain Name to Amazon S3
Posted: December 31, 2016
This article is the last in the series. If you have followed all the steps leading up to this you have registered your domain name and uploaded all the edited files into an Amazon S3 bucket. You are now ready to point your domain name to the bucket so that it will be seen by the world using your companies domain name. You will then be able to conduct final testing and editing to make sure everything works right.
In this post we will configure Amazon Route 53 DNS to connect your registered domain name to your Amazon S3 bucket. We will also update your domain name registrar to point to Route 53 DNS.
What is DNS?
If you recall from a previous post DNS stands for Domain Name System. It is like a global phone book. It is a directory of domain names with their assigned IP addresses. The server in which you host your website has a number called an IP address assigned. DNS provides the address of your site when a person types in a domain name in their browser.
Configure Route 53 at Amazon Web Services
Log in to AWS and head over to Route 53.
-
You will create a hosted zone by clicking the blue Create Hosted Zone button. Then enter your domain name without the
www. In this example, I enteredlampapps.com. (lampapps.net is another hosted zone I have at Route 53). Leave the Type as Public Hosted zone.
-
The result will have your default records set up. You will now need to add to these records to point to your buckets. Click Create Record Set.

-
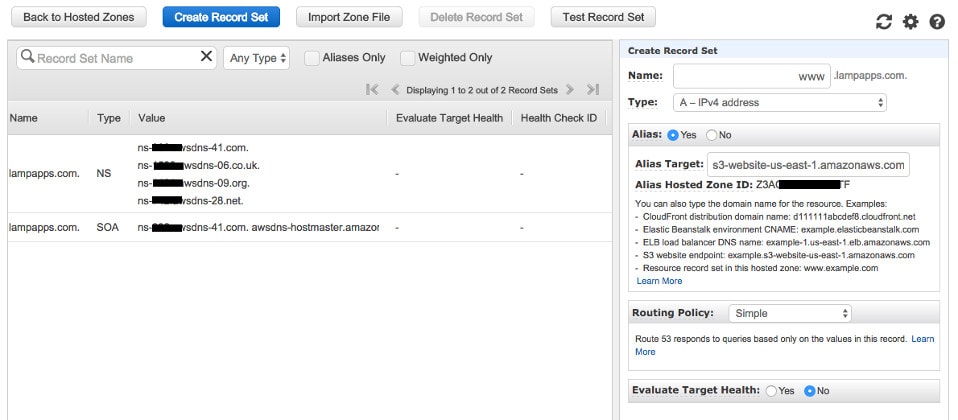
Enter
wwwin the Name field. Select Alias - Yes. Click in the Alias Target field and look for your matching S3 bucket name. Select it. Leave the remaining options at their default settings. Click Create.
-
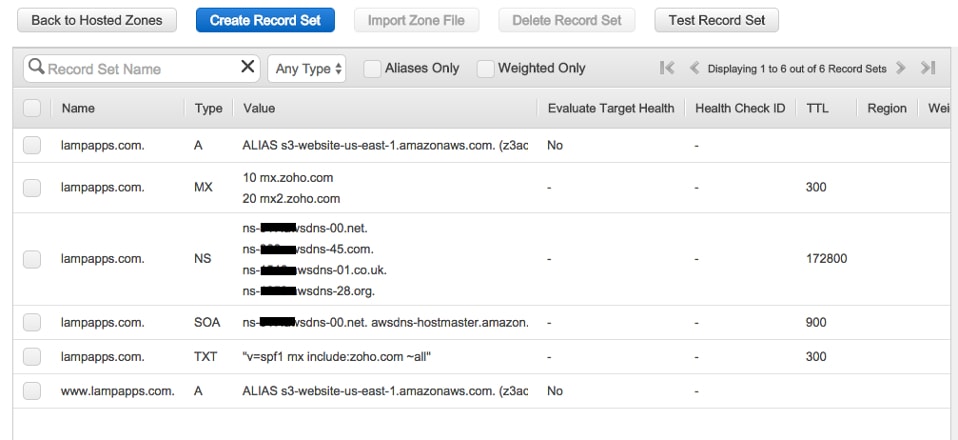
Repeat Step 3 for your naked domain (no preceding
www) by leaving the Name field empty. The resulting hosted zone should look like the screen shot below. This screen shot has two additional records for email (MX and a TXT). Those are not required for your website to work. They will be required if you want to use email with this domain name.
-
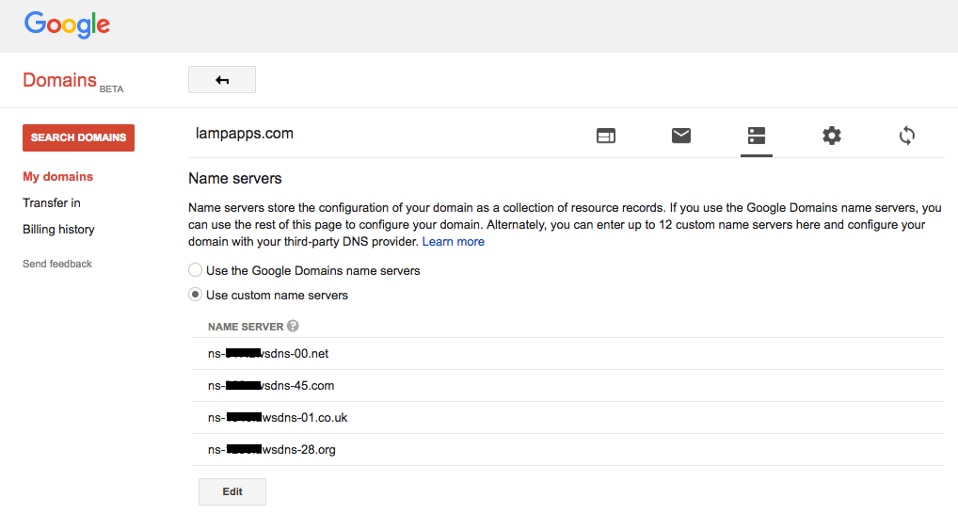
You now have to tell your domain name registrar where to send all requests for your website. Log into the service where your domain name is registered (my example is Google Domains) and select Custom Name Servers. Enter each Name Server Exactly as it appears at Route 53 in the NS record. You will notice a period
.at the end of the NS records at Route 53. Route 53 presents that to you and it is required, but some services add it by default and do not show it to you. Google Domains strips it off if you add it.
-
You now have
www.example.comandexample.comset up to serve your website. But you will have to wait to see it for yourself. DNS can take up to 24 hours or more to propagate around the world to all the DNS services. In addition, if your domain was previously setup to point at another hosting services, you may have that cached (saved) in your computer, router, or with your Internet Service Provider (ISP). This means that your computer won’t show the most recent updates until he cache clears. This can take hours or days. However, You can track the progress of DNS propagation and also avoid the cache issue until everything sorts itself out.- Use this website track DNS propagation. Enter in your domain name, select NS and see if it comes back to the Name Servers you entered at your domain name registrar. It takes time, so be patient.
- You can use a proxy browser to circumnavigate the cached data from your old DNS. Search Google for “Proxy Browser”. Many to choose from.
Don’t rush this process. If you do not see results in the first 30 minutes it may take hours, if not a full day for your computer and everything else to refresh to the right DNS information. Resist the urge to go in and “fix” the settings. You will just start the entire process all over again each time.
I would love to hear from you. Please leave your comments below. You can also share this post on Facebook and Twitter.